Tuesday, June 29, 2010

Thai Chicken Lettuce Wraps


Wow...K...been away for a bit. I do apologize, for the updates to the blog or the lack there of. Fortunately I have been taking pictures and keeping up with the cooking. Before we go any further I really want to thank each and everyone out there for their support.

Well...almost like starting over...mmm...not really. I hope you are ready for a little, well depends on how much you make to eat really...but today is Thai Chicken Lettuce Wraps!!! Super good, super fuel.  These are a hit at both my house and the fire station.  Yes I am trying to convert the fire house...with a sneaky attack...paleo style.

Wraps:
2-4 grilled chicken breast (seasoned as you see fit, however...have fun since we are doing Thai, play with Thai flavors) 


head of uncooked broccoli (the very very tops cut off, I really like my broccoli in really small pieces, makes wraps easier to manage)


carrots (shredded, thin slices, julienned...anyway you like them)


cilantro (chopped)


green onion (sliced very thin)


romaine lettuce leaves (cut the bottom off and use the whole leaf)


Chicken Seasoning:
olive oil


red pepper flakes


sarachi sauce


lemon grass (I know, I know...I was making these at the fire station and had to use what was available at the local grocery...so shoot me.)


ginger


pepper and salt (this picture never gets old)


garlic powder (pictured above)


cumin (k, I thought by now I would have a pic of this, will get it on the next time)

Almond Sauce:
1/4 cup almond butter (need a pic of this, I like the fresh ground from the store)
1/4 cup water (would be as funny as the pepper salt pic...but hey, we never know)
soy sauce (start with 1 tbs, at the most I would use 2 tbs...really depends on what your taste buds tell ya)


2 garlic cloves (minced and smashed)


2 tbs of fresh squeezed lime juice


1-2 tsp lemon grass (minced and smashed...if you use fresh, if you can find. I recommend using a zester)
1/2-1 tsp ginger (minced and smashed/zested(?))
1-2 tsp sarachi/Thai chili sauce/hot chili oil (this depends on availability and heat...use what you can find, then manage the heat to your liking)
touch of honey (will get a pic soon)


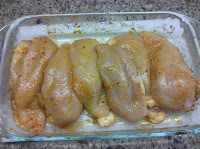
Like I said Thai Chicken...so lets season our chicken to match the dish.  I actually started seasoning the chicken this way on my third attempt...and wow...a whole nother level!!!  Start with rinsed and thoroughly pat dried chicken.
Drizzle your choice of oil, I like to use grape seed...truly your choice. Once drizzled, add pepper, salt, sarachi sauce, lemon grass, tad of ginger, garlic powder, red pepper flakes, cumin...I know, I know...sounds like a lot...trust me it is worth it.  Now rub your chickens nicely.
Let your chicken rest and soak up the goodness, mean while lets work on the other things.
Once you have prep'd your fillers or during prep...turn your grill on.
I like to use a Med High heat...takes roughly 5-8'ish min per side.  Always let your chicken rest tented under aluminum foil for at least five min before cutting.  Please refer to my previous blog about checking the doneness of meat with out cutting it open.
While your chicken is cooking and resting, lets put the almond sauce together.  Pretty easy. Take the ingredients and in a mixing bowl whisk all the ingredients together.  Now if you have had peanut (ah!!!) sauce in the past, you may know what flavor you are looking for.  As for me...I can only suggest, if you are using a new spice or herb or whatever it may be, please start with little bit mix, taste and continue till you get a flavor your taste buds like.  I have mixed feelings on using too much soy sauce, so I will always recommend, start with a little bit and work up.  My best explanation of flavor, should have a nice creamy, yet slightly thinned texture.  Peanut to Almond taste, little sweet, little heat, with a nice blend of lemon grass, garlic, ginger.
K, now thin slice your chicken once rested, take a nice sized romaine leaf, and fill to your hearts content of all your favorite fillings.  Mrs. Chalk Monster likes to add thin sliced cabbage, which adds another texture and flavor layer. If you have other ideas please share in the comments section.  Again thank you for your patients.  Hope all is well with each of you and your families. Eat well, eat lots, eat simple, eat primal, have fun, teach others! Aloha!
Tuesday, June 8, 2010

Grillin Time!!!

Hello...there. Well like I have said in an early post I am going to go over some helpful tips or hints even a couple ideas for grilling. If after reading this post you have better suggestion or recommendations, please share them so we can get the best information out there.

K...now I want to start on what to grill. Eeek...I know...scary. Really, I think the grill at times can be intimidating even for me, however the more we cook on it, the more it becomes a tool in our chest. Now we pretty well know that meat has dominated the majority of grilling how to out there. The veggies take up a couple of the remaining pages towards the back. So here are some of my favorite vegetable ideas:

Yellow squash and zucchini (cut into slices length wise or rounds, even as sticks, season with my secret spice mix, from that guy)

Egg Plant (yes it works, I recommend 1/4 - 1/2" slices, season simply with pepper, salt, and olive oil)

Avocado (I really like them cut in half still in the shell and seed removed, season with pepper, salt, cayenne pepper, olive oil)

Asparagus (olive oil, pepper, salt, and any other spice to kick up the flavor)

Brussels Sprouts (yes even these, similar seasoning as the above items, I like roasting them in the oven, however this past weekend I was prepared these awesome things straight from the grill.)

Pineapple (just as is, super good when these bites get nice grill marks, wedges or rings)

Tomatoes (large slices or wedges seems to work best)

Onion wedges (onions will sweeten up once good heat is applies)

Bell Peppers (or really any type of pepper for that matter, especially if you are in to making your own salsas and such...if you haven't tried them do so, I recommend)

Mushrooms (funny, not really my favorite thing to eat, although grilled mushrooms are more agreeable to my tongue, however nothing beats sauteed mushrooms and onions...mmm caramelization)

So, these are a few of my favorites from the top of my head.  I am positive there are many others, so please post'em up in the comments.

I do apologize for the delay on this post, I was at the fire station yesterday between running calls and shotty internet connection...I am doing this post today.

So how can we tell if and when the meat is ready to remove from the grill with out the sacrificial cutting and draining of the juices??? The best tool is...your hand. 

Take the meat off the heat and press it with with your index finger. The firmer it is, the more done it is. Use your hand as a guide.


Poke the soft area of muscle between your thumb and index finger when your hand is relaxed. If the meat feels like that, it's probably too underdone (except for the tartare crowd). Stretch your fingers halfway open, and poke again. It feels firmer but still gives. That’s closer to medium rare.


Stretch your fingers halfway open, and poke again. It feels firmer but still gives. That’s closer to medium rare.


All the way open feels firm and approximates medium. Make a fist and poke again. That's well done.


Well I hope all this info helps.  Thank you for your support.  Have fun and eat up!!!

Sunday, June 6, 2010

Paleo Banana Almond Pancakes

Aloha to all. Saturday was a great day for paleo goodness...starting with the pancakes I am about to reveal and then having two grill outs...plenty of quality grass fed, natural, and cage free protein with a ton of awesome organic veggies...which will be covered on the next post. For now I am making one of my all time favorite breakfasts.  I have seen a couple paleo pancake recipes out there, however there happen to be one or two things missing.  So taking what I remember from my pre non paleo pancakes I used to make and applying what I could to the new paleo friendly pancakes, I believe you will find these pancakes worth the couple extra ingredients and steps.  I can not thank you all enough for your support and feed back, again if there is a recipe out there you would like me to post let me know.  This blog is for all of us old and new to the paleo plan.  All I ask is enjoy your food and enjoy cooking it. Pancake time!!!

Helpful Hint:  I highly recommend finding/purchasing a flour sifter.  In my experience when using almond flour is without sifting it, the batter makes gritty textured pancakes, not bad...but not what I enjoy the most.  When I started using a flour sifter, the pancakes have a much smoother texture...more in line with the old non paleo pancakes.

Pancake Mix:
2 cups almond flour (sifted, you don't have to pack the measuring cup, nor recommend doing so, the natural oils in almond flour will reverse what you where trying to accomplish by sifting)


6 eggs (room temp)
I know I only have 4 pictured here...shh.


organic coconut milk (I use about half a can, you can use more if you like thin batter, or less if you like thick batter)


1 banana (almost completely brown skin, I mash the banana inside its peel before adding to batter)


1 tsp organic vanilla extract


2 tsp baking soda (gluten free)


1 tsp cinnamon
1 tsp nutmeg


Organic Maple Syrup (used sparingly)


Equipment:
mixer (stand/hand)
mixing bowl
spatula
cookie sheet (I use this to catch the almond flour I am sifting into the measuring cup)
griddle (or whatever you use to make pancakes)
measuring spoons and cups

Fun time:
Grab your cookie sheet set your measuring cup on it.  Pour your almond flour into the sifter and sift, till you get your two cups. Using the cooking sheet is nice, because you do not end up wasting any of the almond flour...which is $$$.
Dump the sifted flour into the mixing bowl add your eggs, banana, cinnamon, nutmeg, baking powder. You can add coconut milk too...start with a quarter can and add as much as you like till you get your desired batter thickness.  I use about 1/2 a can which with this recipe quantity, I can get between 11-12 pancakes, when using a 1/3 cup measure to pour out the pancakes...found the 1/3c measure makes a really good size pancake...but I have on occasion made the "Uncle Buck" full griddle pancake for fun...and laughs from Mrs. Chalk Monster.
Mix your batter on medium speed till all is thoroughly mixed...try not to over mix...mom said this to me a long time ago...guess if you beat the batter to hard and fast you can end up with a tough batter.
Now that you have your mix ready pour out your pancakes.  As for how hot your griddle or pan should be...wow...I really do not know.  I will say this, only because I did it...trial and error.  Once you find a good temp write it down some where or mark it on your griddle.
Once you pour out your pancakes, wait till the edges look firm or solid. Then flip, look for a nice golden brown, if it is too light you know to go longer, too dark go less time on each side.

K, that is it...hopefully this has helped.  I am at fault at times of over wording things, so I do apologize for that but I am trying to be as helpful as possible.

Dress your pancakes anyway you like.  I added coconut oil, instead of butter, sliced almonds, blackberries, raspberries, and blue berries. Finally I sparingly used the Organic Maple Syrup.  So dress them up the way you want...send me your toppings or ideas and we can see how awesome we can make these. Thank you and eat up!!!


Friday, June 4, 2010

Almond Apricot Chicken Salad

Good afternoon to all. Thank you so much for your support. Today's tastiness is a re-creation of some goodness I tried over the memorial day weekend.  Surely there are a thousand ways to make a classic or not so classic chicken salad. However, I will admit apricot in chicken salad was never on my list till I tried some from the deli at the local grocery store.  I do know what I bought was not entirely natural and paleo, so I set out to make it that way.  To keep everyone on the same page here...if you have a dish out there, an all time favorite you know is not paleo or natural, please let me have a try.  I am sure with everyone's help we can get something so close you will not be able to tell the difference, except the fact that your body will love you for the awesome fuel it has received. Keep the comments coming, good or bad...I here for you all.  Thank you.

Kk...some words on chicken. Whether you buy frozen or fresh, always rinse thoroughly and pat dry.  Next season...you can run the olive oil and spices way...or try my latest crave just spices and pat on dry.  Maybe in the future I will do a "How to Spice Your Chicken Right" post...be on the look out. Time to cook.

The Goods:
2-4 chicken breast (pulled with a fork against the grain of the muscle...your meat will peel right off.)
   AHH!  I failed here and did not get a pic of the pulled chicken. My apologies.

2-4 apricots (peeled, stem and seed removed, and cubed)


1/2-whole avocado (sliced or cubed)


sliced almonds (as much or little as you like)


green onion (about a tbs/per chicken breast, really thin sliced)


Dijon mustard and organic natural mayo


garlic powder (just a touch)


pepper and salt (flavor balance)


Equipment:
large mixing bowl
spatula

Cook'n time:
Once you have pulled your chicken apart, place all the meat into the large mixing bowl.
Add your mayo little at a time and fold.  Repeat till you get the look and consistency you desire.  Remember this is a chicken salad...so we want to still taste the chicken...not the dressing.
Next add the Dijon mustard, start with a little bit and fold.  I know when I have used just the right amount when the mayo taste has just faded away. 
Follow up adding green onions and the avocado...I use avocado for a couple reasons in my tuna/chicken salad mixes:  One, it is a super food. Two, it adds a nice creamy texture to the salad, without adding more mayo.
Toss in as much of the apricot and almonds as you feel. It is all up to you. Continue to fold till the salad is mixed well.


Now what to do with all this wholesomeness...well Mrs. Chalk Monster made a great bed of mixed green salad, with grape and sunburst tomatoes, and the left over apricot not used.  But really you can put this with anything, stuff bell peppers, add to the top of a burger patty, lettuce wraps, you name it...matter of fact if you come up with other ideas, please post in the comments and I will post'em up.  There is only one thing left to do and that is enjoy!!!

Thursday, June 3, 2010

Parmesan Cheese Crusted Meat Balls w/ Honey Dijon sauce and Sauteed Veggies


Hope all is going well for everyone. Last night Mr. and Mrs. Chalk Monster had planned to make some nice Paleo Meatloaf, however we went another direction and came up with something that the both of us really liked. I used what I had in the pantry and spice cabinet and such. So lets get started...but first a side note: These were really large, and didn't cook completely through, so I cut them in half to finish.  If I was to do it all over again I would make 8 meatballs instead of 4 for easier cooking. Even though this post is long the meal is actually pretty quick to make.  Thank you for your awesome support...3...2...1...WORK!

Meat Ball needs:
1lb pack of ground sirloin 90/10


1lb pack of ground turkey 85/15


3 slices of bacon cut into 1 inch pieces


2 egg yolks


1/2 of a 4 oz can of hatch green chilies (I prefer hot)


3 chipotle peppers in adobo sauce (sliced)


Parmesan cheese (I used the kind in a shaker)


garlic powder


season all (its the closest thing to my secret spice mix..."I know a guy.")


pepper and salt (to balance the taste)


Veggie needs:
1 yellow squash (sliced or diced)


1 zucchini squash (sliced or diced)
(use your imagination here...if there are more veggies you want cook'em)


coconut oil


pepper and salt
Parmesan cheese

Equipment:
large mixing bowl
your hands
something to roll the meatballs around the Parmesan
skillet (2 of them one for the meat and one for the veggies)
tongs

Start this whole thing off by cooking the bacon pieces, till they are crispy, will make it easier for crumbling into the meatball mix.
While the bacon is cooking open your ground sirloin and turkey place into large mixing bowl.  Add 2 egg yolks, sliced chipotle peppers, hatch green chilies, garlic salt, season all/secret spice mix, pepper and salt.
When the bacon is done remove skillet from heat, place bacon on paper towel to dry up grease.  Next crumble the bacon to the meat ball mix.
Now thoroughly fold in all the ingredients with you hands, please wash those first. Once everything is all nice and mixed, being careful to over mix, which can dry your meat out once cooked, be nice to it.  Now form your meatballs, 4-8 or what ever your fancy.
With the "something" you have chosen to roll your meat balls around on the Parmesan. Take each meat ball and roll them around the Parmesan thoroughly coating them.
Once that is done...now comes a decision.  Either you can dispose of the bacon grease...or as I did and keep it to help cook the meatballs...Put your stove to med-high heat 7-8 on mine and place 2-4 meat balls, depending on size in your warm skillet. Cooking each side...should roughly turn each meat ball 8 times, use tongs not a fork or a knife.  Side Note:  When cooking meat never, ever, ever, ever cut your meat to check if it is done, you will loose all juice keeping it moist...hence drying it out.  Next post I will go over how to tell when meat is done.
K, once meat balls are done, tint them with aluminum and let rest for about 5 min.

For the veggies I cooked them during my second round of meatballs, if you are only making one round try starting the veggies after your 4th or 6th turn of the meatballs.
Heat your skillet to med-high, 6-7 on my stove. Use about a tsp to tbs of coconut oil.
Toss in veggies, season to your liking, add a some Parmesan.  I add the Parmesan to tie in flavors from the meat balls.

Plate up the meat balls and veggies as is or you can make my quick Honey Dijon sauce to top the meat balls.

Honey Dijon Sauce needs:
honey (natural unfiltered, a good Texas brand)
Dijon mustard (if you want to know email me. It is naturally natural)
organic mayo (the market from the "central" part of town, catch my drift, has a nice natural one)


pepper
cayenne pepper (hmm no pick yet)

Now I make this purely by feel...and taste. I know someone will be frustrated.  Here I go, in a small container take about a spoon full or so of mayo, add Dijon mustard (less than the mayo, you can add more if it tastes too mayo'y), pepper, honey, and cayenne pepper (just a touch...or two) mix together thoroughly...now what I look for in taste, is the lack of mayo taste, but not too strong on the mustard...honey taste should come through just enough to let you know there is some sweetness, pepper and cayenne add more flavor layers.


 Drizzle or pour...the Honey Dijon on top the meat ball and eat up!!!